What is HSTS
HSTS stands for HTTPs Strict Transport Security. HSTS tells web browsers that they should always interact with the server over https.
We are increasingly seeing websites serving content over HTTPS. Normal https websites use 301 permanent redirect to redirect insecure http requests...
Read full story here:
What Is HSTS and How To Enable It on Nginx
Saturday, January 30, 2016
What Is HSTS and How To Enable It on Nginx
Thursday, January 28, 2016
How to Properly Add Your Site to Google Search Console
Google Search Console is known as Google webmaster tools. In this tutorial, I will show you how to add your site to Google Search Console and get the most out of it for your website.
Add a Property
Go to Google Search Console home page. Login with your Google account. Then click the Add a ...
Read full story here:
How to Properly Add Your Site to Google Search Console
Monday, January 25, 2016
How to Back Up and Restore MariaDB Databases From the Command line
MariaDB is a community-driven variant of MySQL. In this tutorial I will show you how to backup and restore MariaDB databases using the mysqldump utility.
mysqldump
mysqldump is the utility that we will use to backup our MariaDB database. It’s designed specifically for backup purpose. The...
Read full story here:
How to Back Up and Restore MariaDB Databases From the Command line
How To Install LEMP Stack on Debian 8 Jessie (Nginx, MariaDB, PHP-FPM)
LEMP stands for Linux, Nginx (Pronounced Egnine X), MySQL/MariaDB and PHP. It enables a server to host dynamic website and web apps. In this tutorial I will show you how to install LEMP stack on Debian 8 Jessie. I choose to install MariaDB as the database server instead of MySQL.
Step-1 Install...
Read full story here:
How To Install LEMP Stack on Debian 8 Jessie (Nginx, MariaDB, PHP-FPM)
Friday, January 22, 2016
Auto-Publish WordPress Posts to Tumblr with SNAP
In this tutorial, I will show you how to auto-publish your WordPress posts to Tumblr with a WordPress plugin called Social Networks Auto-Poster, or SNAP for short. Previously, I have written some articles about auto-publishing WordPress Posts to social media sites and blogging platforms. If you...
Read full story here:
Auto-Publish WordPress Posts to Tumblr with SNAP
Auto-Publish WordPress Posts to Blogger with SNAP
Social Networks Auto-Poster or SNAP for short is a WordPress plugin that enable webmasters to auto-publish their posts to a host of social media sites and blogging platforms. In this tutorial, I will show you how to setup SNAP with Blogger.
Auto-Publish WordPress Posts to Blogger with...
Read full story here:
Auto-Publish WordPress Posts to Blogger with SNAP
Thursday, January 21, 2016
Auto-Publish WordPress Posts to Facebook Page with Hootsuite
In this tutorial, I will show you how to auto-publish wordpress posts to Facebook Page with Hootsuite which is a social meida management tool. After you set it up, Hootsuite will check your website’s RSS feed hourly to see if there’s new posts on your website and publish your posts...
Read full story here:
Auto-Publish WordPress Posts to Facebook Page with Hootsuite
Monday, January 18, 2016
How to Create a Facebook Page
Facebook page is also known as facebook business page. When you create an account with facebook, you have a facebook profile but you do not have a facebook page. Let’s get started on how to create a facebook page.
A Detailed Guide to Creating A Facebook Page
First you must have a facebook...
Read full story here:
How to Create a Facebook Page
Sunday, January 17, 2016
How to Solve perl: warning: Setting locale failed
Today, on my ubuntu server I executed the following command to reconfigure MariaDB server.
sudo dpkg-reconfigure mariadb-server-10.0
A warning appeared on the screen.
perl: warning: Setting locale failed.
perl: warning: Please check that your locale settings:
LANGUAGE = "en_HK:en",
LC_ALL =...
Read full story here:
How to Solve perl: warning: Setting locale failed
Saturday, January 16, 2016
mysqldump: Error: Binlogging on server not active-A Comprehensive Solution
mysqldump: Error: Binlogging on server not active
I was using the mysqldump utility to backup MariaDB databases on my ubuntu15.10 server, the following error appeared:
mysqldump: Error: Binlogging on server not active
The solution is fairly simple most of the time. All you need to do is to...
Read full story here:
mysqldump: Error: Binlogging on server not active-A Comprehensive Solution
Monday, January 11, 2016
Difference Between NPN and ALPN plus How to Enable ALPN on Your Site
NPN (Next Protocol Negotiation) and ALPN (Application Layer Protocol Negotiation) are both a TLS extension. Since https, SPDY and HTTP/2 operate on port 443, the client and server need to negotiate what application layer protocol, plain http/1.1, SPDY or HTTP/2 to use after SSL/TLS secure...
Read full story here:
Difference Between NPN and ALPN plus How to Enable ALPN on Your Site
Sunday, January 10, 2016
SSL/TLS Handshake Explained With Wireshark Screenshot
An encrypted connection is established betwen the browser or other client with the server through a series of handshakes. In this article I will explain the SSL/TLS handshake with wireshark.
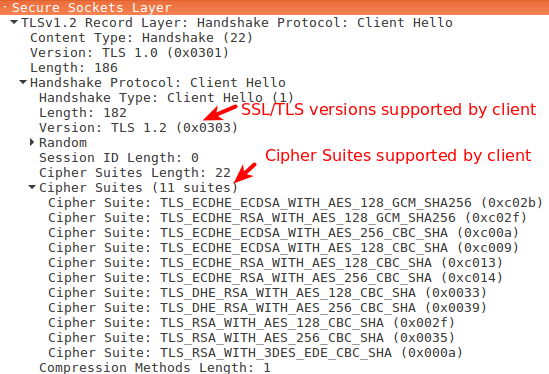
Step1. Client Hello
The client begins the communication. The first step is called client hello. The client lists the versions of SSL/TLS and cipher suites it’s able to use.
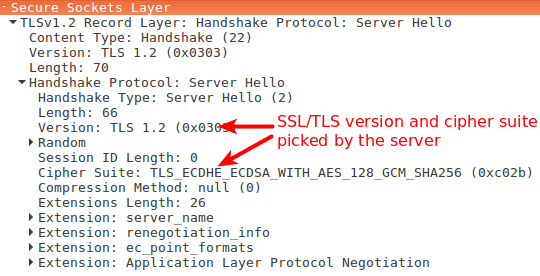
Step2. Server Hello
The server will see the list of SSL/TLS versions and cipher suites and pick the newest the server is able to use. Then the server send a message to the client containing the SSL/TLS version and cipher suite it chose.
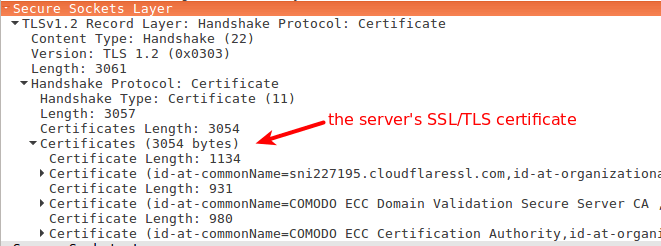
Step3. Server Key Exchange
After the server and client agress on the SSL/TLS version and cipher suite, then server sends two things. The first is its SSL/TLS certificate to the client. The client (web browser) validates the server’s certificate. Web browsers store a list of Root CA(Certificate Authority) in itself. These root CAs are third parties that are trusted by web browsers. The server’s certificate is issued by root CA or immediate CA. Immediate CA is a CA that is trusted by root CA.
Web browsers trust Root CA. Root CA trust immediate CA. If the server’s certificate is issued by a trusted root CA or immediate CA, then the browser turst the server’s certificate. I will tell you how to find these root CAs in your web browser at the end of this article.
The second thing the server sends is its public key and signature. The public key is actually included in the certificate. The client and the server encrypt message with the public key and it can only be decrypted with the private key. The server never share its private key with anyone.
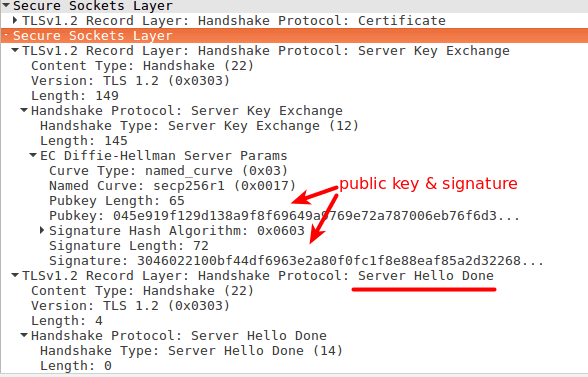
At the end of server key exchange, the server sends a server hello done message.
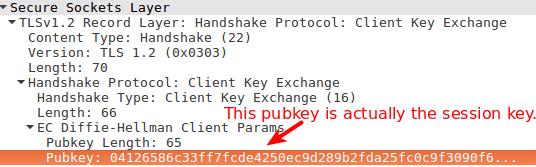
Step4. Client Key Exchange
Until now, all the infomation sent between the client and server is unencrypted. Now the client receives the server’s public key and generate a new session key (aka pre-master key) encrypted with the public key and sends it to the server. The session key can only be decrypted with the private key and because only the server has the private key so only the client and server know the session key. This session key is only valid in one session. If the user close the client and visit the same server next day, a new session key will be generated by the client.
Step 5. Change Cipher Spec
The change cipher spec message is sent by both the client and server to notify the receiving party that subsequent records will be protected under the just-negotiated CipherSpec and keys.
Step 6. Encrypted Handshake
The client and the server sends to each other an encrypted message saying the key information is correct.
Now the client (web browser) will see a green lock in the address bar. The client and server encrypt http traffic with the session key.
How to View Root CAs in Your Browser
Firefox
Go to Tools > Options > Advanced > Certificate > View Certificate.

Chrome
Go to settings > show advanced settings > manage certificate > authorities.

SSL/TLS Handshake Explained With Wireshark Screenshot
Friday, January 8, 2016
How to Enable File Sharing between Host and Virtualbox Guest
In a previous tutorial, I showed you how to install virtualbox guest additioins on Debian. This tutorial will explain how to enable file sharing between host and virtualbox guest OS. In order to do this, you have to install guest additions in the guest OS first, so if you haven’t done yet,...
Read full story here:
How to Enable File Sharing between Host and Virtualbox Guest
Thursday, January 7, 2016
Install Wireshark on Linux and Allow non-root User to Capture Packets
In this tutorial, I’m going to show you how to install wireshark on Archlinux, Debian/Ubuntu, Fedora. By default, only root can capture packets and I will explain how to let non-root users to be able to capture packets.
Installation
Archlinux
sudo pacman -S wireshark-gtk
or
sudo pacman -S wireshark-qt
Debian/Ubuntu
sudo apt-get install wireshark
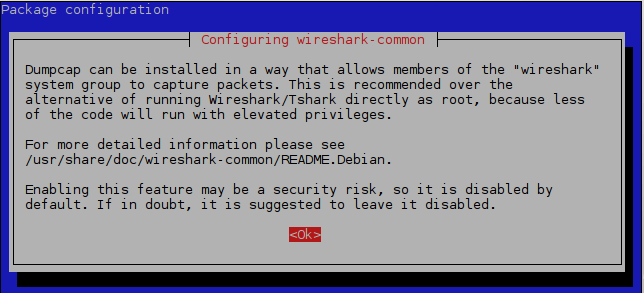
During the installation process, it will let you know that by default non-root users are not allowed to capture packet. Hit Enter.
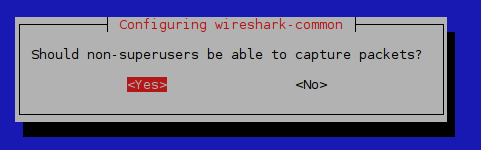
Next, it will ask you Should non-superusers be able to capture packets? Press the left arrow key on your keyboard to select <Yes> and hit Enter.
Elementary OS
sudo apt-get install wireshark
Fedora
sudo dnf install wireshark-gnome
Start Capturing Packet
A new group named wireshark will be created when installing wireshark. You can verify this by looking at the end of /etc/group file.
tail /etc/group
Note that when installing wireshark on elementray OS, there is no wireshark group, you have to run sudo dpkg-reconfigure wireshark-common command to create wireshark group and allow wireshark group members to be able to capture packets.
Running Wireshark as root is insecure. To run wireshark as normal user you have to add yourself into wireshark group.
sudo gpasswd -a <username> wireshark
Wireshark will be the user’s secondary group. To temporily set wireshark as the user’s primary group, run the following command:
newgrp wireshark
Now start the wireshark program from the terminal:
Archlinux: wireshark-gtk or wireshark-qt
Debian/Ubuntu: wireshark
Fedora: wireshark
If you want to start wireshark in application menu, you have to log out of the current session and log back in.
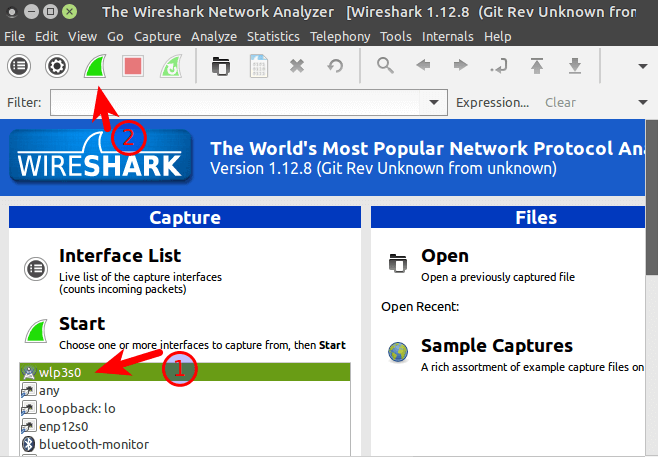
In the wireshark graphical interface, choose an interface to capture from. In my case I chose the wireless interface wlp3s0. Then click the green shark fin icon to start capturing packets.
Install Wireshark on Linux and Allow non-root User to Capture Packets
Wednesday, January 6, 2016
How to Install Virtualbox Guest Additions on Debian Step by Step
In this tutorial I will show you how to install virtualbox guest additions on Debian virtual machine. Guest additions allow your guest OS to be full screen. So you can use the guest OS just like you are using a normal OS. I am using elmentary OS as the host OS, but the following method works for any host OS.
Install Virtualbox Guest Additions on Debian
Log into Debian (Guest OS) as root and update your software.
apt-get update && apt-get upgrade
Install required packages for building kernel modules.
apt-get install build-essential module-assistant
Prepare your system for building kernel module
m-a prepare
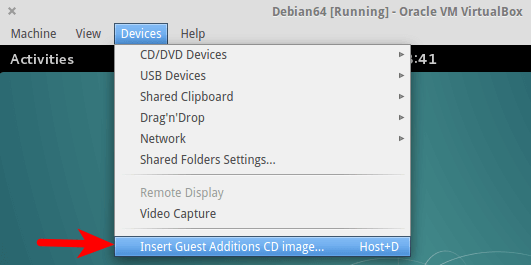
In the virtual machine window, select Devices > Insert Guest Additions CD image.
It will ask you to download the guest additions iso image. Click Download.
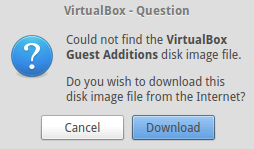
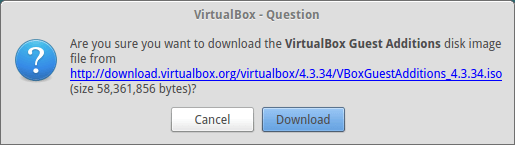
If you can’t download it from the above window, then go to http://download.virtualbox.org/virtualbox/. Select a version and download VBoxGuestAdditions iso to your home directory.
Once downloaded, insert the iso image. If you see the following error, click force umount.
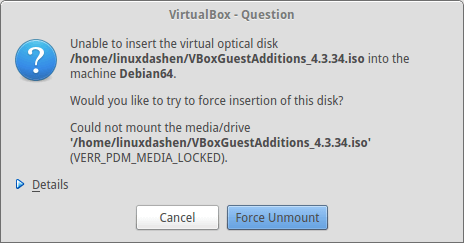
In Debian terminal, run
mount /media/cdrom
Under /media/cdrom directory there’s a shell script named VboxLinuxAdditions.run. Run this script.
sh /media/cdrom/VBoxLinuxAdditions.run
Outputs
Verifying archive integrity... All good.
Uncompressing VirtualBox 4.3.34 Guest Additions for Linux............
VirtualBox Guest Additions installer
Copying additional installer modules ...
Installing additional modules ...
Removing existing VirtualBox DKMS kernel modules ...done.
Removing existing VirtualBox non-DKMS kernel modules ...done.
Building the VirtualBox Guest Additions kernel modules ...done.
Doing non-kernel setup of the Guest Additions ...done.
You should restart your guest to make sure the new modules are actually used

Installing the Window System drivers
Installing X.Org Server 1.16 modules ...done.
Setting up the Window System to use the Guest Additions ...done.
You may need to restart the the Window System (or just restart the guest system)
to enable the Guest Additions.

Installing graphics libraries and desktop services components ...done.
Note that building kernel module must be successful. Now restart your virtual machine. You should be able to enter full screen mode by pressing Right Ctrl + F.
How to Install Virtualbox Guest Additions on Debian Step by Step
Tuesday, January 5, 2016
WordPress Security: Hackers Can Get Your Origin IP and How to Stop It
Today, I found a vulnerability in WordPress. Hackers can exploit it to get your server’s original IP so they can launch an DDOS attack. Here’s how they can get it and how you can stop it.
Get Server’s Original IP Through User Registration
Step 1. Register An Account on Your WordPress Site
Go to one of the following URL to register an account:
yourdomain.com/wp-admin

yourdomain.com/wp-login.php

yourdomain.com/wp-login.php?action=register
Enter an username and email address. As the admin your WordPress site, you will receive an email notification that a new user is registering an account on your site. At the same time, you site will send an email to the new user (hacker) to set a password.
Step 2. Open Original Email Message
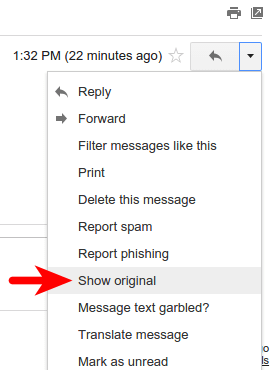
Instead of setting a password, the hacker open the original email message or the source email message. In Gmail, open the email sent by WordPress and on the upper-right corner click the drop-down arrow and select show original.
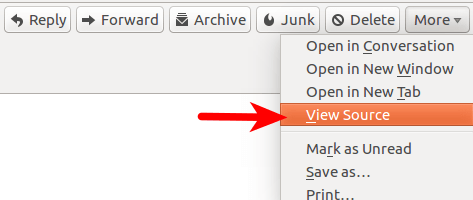
In Mozilla Thunderbird, open the the email sent by WordPress. On the upper-right corner, click More button, and select View Source from the drop-down menu.
Here’s how the first few lines of original message or source message look like:
Return-Path: <admin@yourdomain.com>
Received:from yourdomain.com([12.34.56.78])<< This is your server's original IP !!
 by smtp.gmail.com with ESMTPSA id 388343daereqrefa.19.2016.01.05.21.32.31
 for <the-hacker@gmail.com>
 (version=TLS1 cipher=AES128-SHA bits=128/128);
 Tue, 05 Jan 2016 21:32:33 -0800 (PST)
In the Received: from line the hacker can see your server’s original IP ! Even if your server use external SMTP server to send email. You server’s original IP still can be seen in the original email message.
X-Received: by 10.66.155.8 with SMTP id qrer3439005dfd.18.1452058439952;
 Tue, 05 Jan 2016 21:33:59 -0800 (PST)
Return-Path: <smtp@external.com>
Received:from yourdomain.com ([12.34.56.78]) << This is your server's original IP !!
 by smtp.external.com with ESMTPSA id rewre134373dfa.35.2016.01.05.21.33.57
 for <the-hacker@gmail.com>
 (version=TLS1 cipher=AES128-SHA bits=128/128);
 Tue, 05 Jan 2016 21:33:59 -0800 (PST)
Why This is Bad for You?
If you use CDN service (You should), your server’s original IP is protected by CDN. When people lookup your server’s IP in DNS, they will get an IP pointed to a CDN node. If hacker launch DDOS attack against your domain, these bad DDOS traffic will go to CDN nodes deployed around the world by your CDN provider. Your original server will not receieve these bad DDOS requests.
But if hacker found your server’s original IP through email, they can launch the DDOS attack directly against your original IP. In a short amount of time, your server load spikes up and your bandwidth runs out. Legitimate visitors will see an Denial of Service message in their browser.
How to Stop it
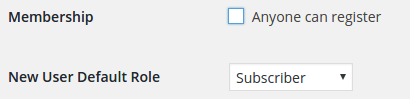
This is simple, you can stop it by disabling user registration on your WordPress site. In the WordPress dashboard, go to Settings > General. Uncheck Anyone can register and save your changes.
The registration link on your site will disappear. So visitors can’t register on your site and your site will not send any email to hackers.
WordPress Security: Hackers Can Get Your Origin IP and How to Stop It
The Web Is Not The Internet and HTTP for Dummies
The Web Is Not The Internet
Tim Berners-Lee invented the World Wide Web (or simply the web) around 1989 when he was working at CERN which is headquartered in Geneva. The web is the dominant Internet application since mid 1990s.
Please keep in mind that the web is not the Internet. The Internet is a network of networks (an internetwork) that is connected by routers, switches, fiber cables, copper wires etc. The web came after the Internet and is an application of the Internet. The web helps people to browse and find information on the Internet. Other applications of the Internet includes Email, instant messaging, DNS etc.
What Are Hypertext And Hyperlink?
Hypertext is text that contains links to other web pages. Hypertext is ususally underlined. Hyperlink is the link that is embeded into hypertext. Through hyperlinks (or simply links), information on the web are linked to each other.
The Internet vs. The Web
The following points help you differentiate between the Internet and the web.
- The Internet is a web of networks which connects computers. The web is a web that links information on the same computer and information on other computers.
- The smallest unit on the Internet is a computer, a phone, a tablet. The smallest unit on the web is a text file, an image, a video, etc which resides on the Internet.
- The Internet is connected by routers, switches, fiber cables, copper wires etc. The web is linked by hyperlinks.
- The Internet is a physical infrastructure. The web is digital.
Web 2.0
Web 2.0 is a participatory web where user can modify the content on the web such as user-generated content on social media, forums, discussion boards. In web1.0, the visitor can only view the content published by webmasters.
The Deep Web
Websites and webpages that can’t be indexed by search engines are known as the deep web. There’re more websites that resides on the deep web than websites that are indexed by search engines. You must be shocked by this fact. We’re just surfing on the surface on the web.
HTTP Protocol
The web mainly consists of three components: web browsers, HTTP protocol and web servers. HTTP is the protocol that is used by browsers and servers to talk to each other. HTTP stands for Hyper Text Transfer Protocol.
HTTP rides above TCP
HTTP protocol uses TCP as the transport layer protocol and as you may know TCP is a connection-oriented protocol which means a connection must be established before two hosts can send data to each other. So in HTTP, the web browser aka user agent must establish a TCP connection before it can send the first request to the server. The TCP connection costs a round trip time
HTTP Versions
HTTP has been around since the beginning of the web. HTTP is the basis of the modern web. The first version we used is HTTP 0.9.
In HTTP/1.0, every request costs one connection. First the browser and the server establish a connection and then the browser send a request, then the server response. After the reponse the connection is closed. If the browser wants to send a new request, it must establish a new connection so the page load time (PLT) is adversely affected.
HTTP/1.1 enables the browser to use an existing TCP connection to send a new request (persistent connection) eliminating the need to establish a separate connection to send new requests. Page load time is improved but the browser must receieve a response to the previous request before it can send a new request. This is known as head-of-line blocking.
Then a feature called HTTP pipelining was added to HTTP/1.1. If both the browser and server support pipelining, then the browser can send multiple requests at once and wait for the server to send back multiple responses. The drawback is that the server is required to response to requests in the order they arrived. If a the first request asks for dynamic content then it takes more time for the server to process the first request and response. The server might have completed processing other requests that asks for static content. But the server have to send the response to the first request. This delays all other response. This is also a head-of-line blocking.
HTTP/2 is standardized in 2015. In HTTP/2 the browser can send multiple requests at any time on a single connection reducing lots of round trip time. The server can send responses at whatever order it likes. This is a true multiplexing.
What is a Domain Name Label
A domain name lable is any text in a domain name that is separated by dot. For example, in www.linuxbabe.com, www is a domain name lable, linuxbabe is a domain name lable, com is also a domain name lable.
A single lable domain is a domain that has no www lable or com lable. Single domain name lable is only vaild inside a local network. They can not be used on the Internet. For example, linuxbabe is single lable domain, but you can not access www.linuxbabe.com by typing linuxbabe in the browser address bar.
It’s common for web developers to set up a local website on their own computer and usually they can visit this local website by typing localhost in browser address bar. localhost is a single lable domain that is pointed to 127.0.0.1 which is the IP address of their own computer.
The Web Is Not The Internet and HTTP for Dummies
Sunday, January 3, 2016
What are SPDY and HTTP/2 and How to Enable Them on Nginx
One of the core technologies powering the web is HTTP. Unfortunately HTTP/1.1 was designed for static HTML sites and was last updated around 1999. The web today has changed quit a lot. Websites are more and more dynamic, contains quit a lot of resources. In this tutorial I will explain waht are SPDY and HTTP/2 and how to enable them on Nginx and also how to test them.
SPDY
In 2009 Google introduced a new protocol called SPDY (pronounced speedy). SPDY offers three key improvments over HTTP/1.1.
1. Header Compression
Every HTTP request and response include a sizeable amount of data in the header. HTTP/1.1 can only compress the content and can not compress the header. SPDY signicantly shrink the header size. In the future SPDY will support sending header once for an entire connection instead of sending them for every repetitive single connection.
2. Parallel Requests
HTTP is a message-based protocol. Once you have established a TCP connection and you send an HTTP request you have to site there and wait for response to arrive before you can send the next request. Each such request requires at least one round trip between the browser and the server which can take hundreds of milliseconds. This is a significant delay.
If one of the responses was slow, it will delay all the other requests. This is called head-of-line blocking. In HTTP, the relationship between the request message and the response message is implicit. The server does not explicitly say I’m the response to that request. You can only identify it’s the response the that request becuase the response follows that request in order.
SPDY offers true multiplexing. With SPDY you can send as many requests as you like at a single connection and get the responses in whatever order. So browsers don’t have to open multiple connections per hostname. SPDY enables them to open one connection per hostname. This will also reduce the load on the server becuase less connections means less sockets are open on the server.
3. Server Push and Server Hint
In HTTP, all communications between the browser and server is initiated by the browser. If the server has something to say, it actually has to wait for the browser to ask for the information. When the browser request HTML, the server knows the browser needs the associated css, javascript or image which needs to be fetched by browser in order to fully render the page. But in HTTP the server has to wait for the browser to request those css, javascript and image.
With SPDY, the server is able to proactively push data without the browser requesting it.
In some cases, server push may be wasteful. For instance maybe the browser already had the css file in its cache and woudn’t download it again. SPDY had a lite version of server push called server hint which means the server only offers suggestions to the browser but the request is still made by the client.
The following techniques are no longer needed with SPDY.
- CSS Sprite
- Inline Image
- Sharding to improve parallel requests.
- CSS/Javascript Concatenation
Limitations
SPDY is great but it still has some limitations.
- The first is that it limits to HTTPS.
- SPDY communicates separately with each host. The browse may have to communicates with multiple hosts in order to fully render a webpage. Even if all of them support SPDY, the browser still have to open one connection per host. Multiplexing can only occure on a per host basis.
How to Enable SPDY On Nginx
As said before, you need to enable HTTPS in order to use SPDY. Fortunately now you can easily get a free SSL/TLS certificate from Let’s Encrypt. If you have not yet enabled HTTPS, please use the following link to get a free SSL/TLS certificate.
An oveview of HTTPS encryption and Let’s Encrypt SSL/TLS certificate delopyment with Nginx
If you have enabled HTTPS, check if Nginx is compiled with SPDY module
sudo nginx -V
If you see the following text, then SPDY module is included in your Nginx installation.
--with-http_spdy_module
Configure server block file
sudo vi /etc/nginx/conf.d/yourdomain.conf
or
sudo vi /etc/nginx/sites-available/yourdomain.conf
In the server section, add spdy after listen 443 ssl.
server {
 listen 443 ssl spdy;
 server_name www.linuxbabe.com;

 ssl_certificate /etc/ssl/fullchain.pem;
 ssl_certificate_key /etc/ssl/privkey.pem;

......
Then save and close the file. Reload Nginx configuration.
sudo service nginx reload
or
sudo systemctl reload nginx
And you are done. Very easy!
As of Nginx 1.9.5, ngx_http_spdy_module was superseded by ngx_http_v2_module. So if you are using a version higher than 1.9.5, you don’t need to enable SPDY. See the following text to learn HTTP/2 and how to enable it with Nginx.
HTTP/2
HTTP/2 is based on SPDY. The HTTP/2 specification was published as RFC 7540 in May 2015. HTTP/2 is binary, instead of textual.
Improvements over SPDY
HPACK Compression
HPACK is a faster and smarter way to compress header. The ngx_http_spdy_module of Nginx disables header gzip compression by default becuase it can be attacked by CRIME.
Requires No SSL/TLS
HTTP/2 protocol itself requires no SSL/TLS connection. But the implementation in all major browser vendors Firefox, Chrome, Opera say they will require TLS.
Enable HTTP/2 on Nginx
As of version 1.9.5, Nginx supports HTTP/2, so you have to install a Nginx version at least 1.9.5. I also suggest compiling the latest Nginx with ngx_pagespeed module, but it’s up to you. Use the following link to see how they’re done.
Install latest version of Nginx on Ubuntu server
Boost site speed by compiling latest Nginx version with ngx_pagespeed module on Ubuntu server
Like SPDY, it’s really simple to enable HTTP/2 on Nginx. Check if Nginx is compiled with HTTP/2 module
sudo nginx -V
Since your Nginx version is at least 1.9.5, you should see the following text in the output.
--with-http_v2_module
Then configure server block file
sudo vi /etc/nginx/conf.d/yourdomain.conf
or
sudo vi /etc/nginx/sites-available/yourdomain.conf
In the server section, add http2 after listen 443 ssl.
server {
 listen 443 ssl http2;
 server_name www.linuxbabe.com;

 ssl_certificate /etc/ssl/fullchain.pem;
 ssl_certificate_key /etc/ssl/privkey.pem;

......
Then save and close the file. Reload Nginx configuration.
sudo service nginx reload
or
sudo systemctl reload nginx
And you are done. Very easy!
How to Check if HTTP/2 is Working on Your Website
Go to https://tools.keycdn.com/http2-test. And enter your domain. Cloudflare has an excellent post about tools for testing and debugging HTTP/2.
What are SPDY and HTTP/2 and How to Enable Them on Nginx
Saturday, January 2, 2016
Differences Between Forward Proxy and Reverse Proxy
There’re two mainly two types of proxy servers:
- Forward proxy: also known as proxy server
- Reverse proxy
Differences Between Forward Proxy and Reverse Proxy
The first difference between the two is that forward proxy is used by the client such as a web browser whereas reverse proxy is used by the server such as a web server. Forward proxy and the client can be in the same internal network, or it can be on the Internet.
Foward Proxy
Forward proxy can be used by the client to stay anonymous online or bypass firewall filter to visit websites that is blocked by school, government, company etc. If a website blocked an IP range from visiting the website, then a person in that IP range can use forward proxy to hide the real IP of the client so that person can visit the website and maybe leave some spam comments. However forward proxy might be detected by the website administrator. There are some paid proxy service that has numerous proxy systems around the world so that they can change your IP adddress every time your visit a new web page and this makes it harder for website administrators to detect.
Forward proxy is very useful and popular in the 1990s. Before NAT is integrated into network routers, forward proxy is the way for muptiple computers in the same network to access the Internet. This type of forward proxy usually resides in the internal network.
Forwad proxy can also act as a cache server in an internal network. If a resource is download many times, then the proxy can cache the content on the server so next time when another computer download the same content, the proxy will send the content that is previously stored on the server to the computer.
There’re many different kinds of forward proxy such as web proxy, HTTP proxy, SOCKS proxy etc. Please keep mind that using forward proxy to browse the Internet usually slows down your overall Internet speed. That depends on the location between you and the forword proxy and how many people are using that forward proxy.
Another thing to be aware of is that thers’re many free forward proxies which is built by hackers for malicious purpose. If you happen to be using one of these proxies, they will log every activity you do on the Internet. So free in charge is actually very costly.
Reverse Proxy
Reverse proxy is mainly used by the server to balance load and achieve high availability. A website may have serveral web servers behind the reverse proxy. The reverse proxy server takes requests from the Internet and forward these requests to one of the web servers. Most visitors don’t know websites are using reverse proxy becuase they usually lack the knowledge and tools to detect it or they simply don’t care about it. Nginx can be acting both a web server and a reverse proxy at the same time.
Differences Between Forward Proxy and Reverse Proxy
How to Setup Social Networks Auto-Poster and Facebook Connection
This plugin automatically publishes posts from your blog to your Social Network accounts such as Facebook, Twitter, Google+(Google Plus), Blogger, Tumblr, Flickr, LiveJournal, Flipboard, DreamWidth, Delicious, Diigo, Instapaper, Stumbleupon, LinkedIn, Pinterest, Plurk, VKontakte(VK.com), YouTube, App.net, Scoop.It, WordPress, XING etc. The whole process is completely automated.
Just write a new post and either entire post or it’s nicely formatted announcement with backlink will be published to all your configured social networks. You can reach the most audience and tell all your friends, readers and followers about your new post. Plugin works with profiles, business pages, community pages, groups, etc. Messages are 100% customizable and adopted for each network requirements.
Today we’re going to look at connecting the NextScript’s Social Network Auto-Poster Plugin, SNAP for short, how to setup a connection with
There’re 3 steps we will go through
- Create a Facebook App
- Connect SNAP to Facebook using the Facebook App
- Test the connection
Why do we need an App
What we’re going to do with this plugin is we’re going to take the content from our website and share them to your facebook page. That sharing is going to be done with an Facebook App. It will enable us to choose the post type, who to share with. You have a lot options with Facebook App.
1 Create the Facebook App
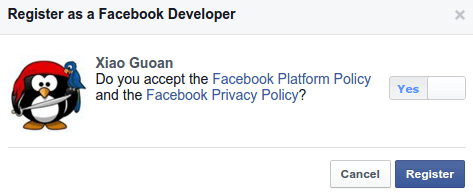
Login to your Facebook account. Then go the the Facebook developer page https://www.developers.facebook.com. Now if you haven’t registered yet as a facebook developer, you need to click blue button Register. A popup will appear notify you to accept Facebook platform policy and Facebook privacy policy. After that click the register button.
After you have registered, a new wizard will appear. We need to click the advanced setup link.
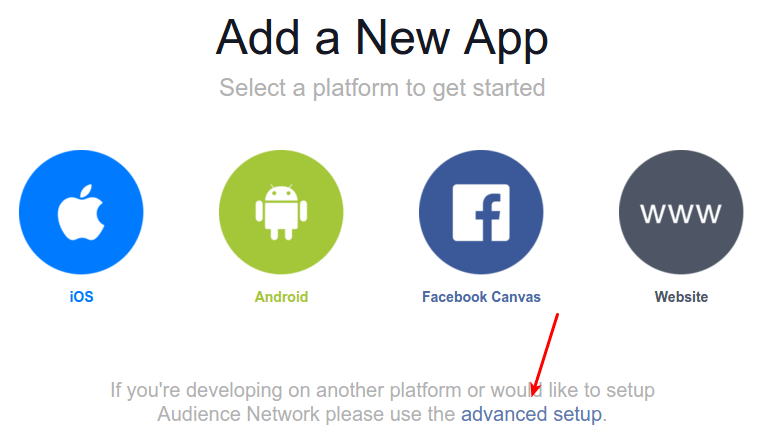
We’re going to name our app, choose a category. You can name it to something like yourdomain.com Via NextScript. Don’t worry about the namespace. After you give it a name and choose a category, click on Create App ID.
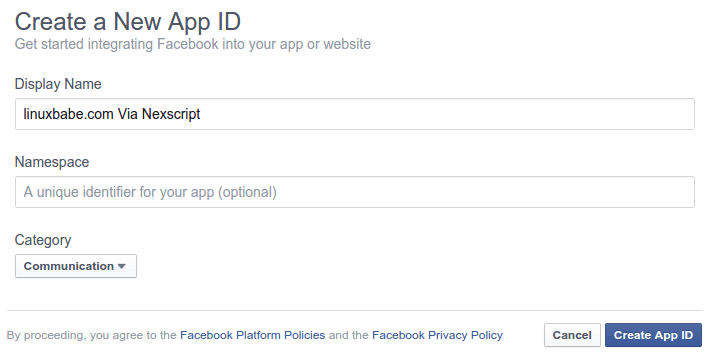
Answer the security check and you have a Facebook App created. Now the two things you need is App ID and App Secret.
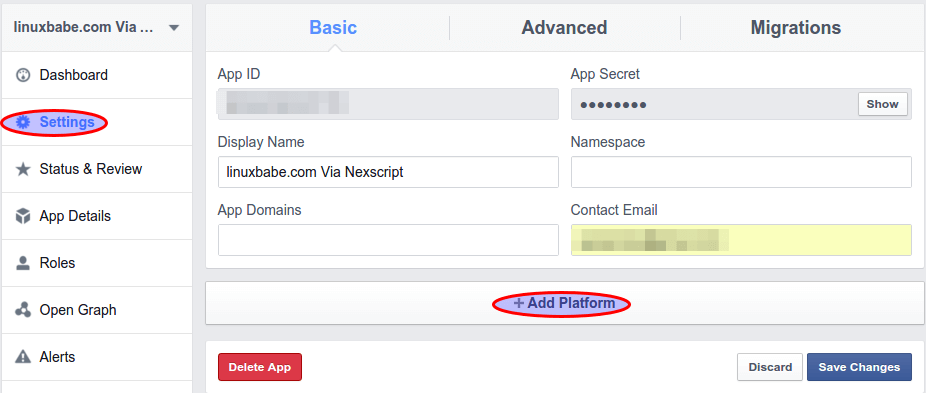
Click the settings tab on the left. Enter your email address on the Contact Email field. Then click Add Platform.
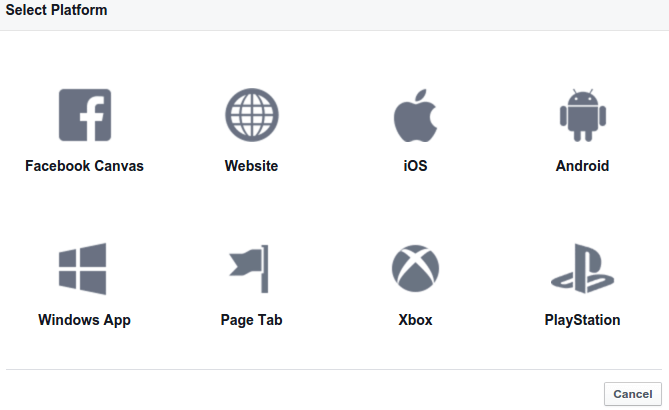
Select website in the list.
Enter your WordPress Address(URL) in the Site URL field and enter your Site Address(URL) in the App Domains field. You can find your WordPress Address(URL) and Site Address(URL) in the general settings of your WordPress Dashboard. Please note that linuxbabe.com and www.linuxbabe.com is different. In the App Domains field you do not need to include the http:// part.
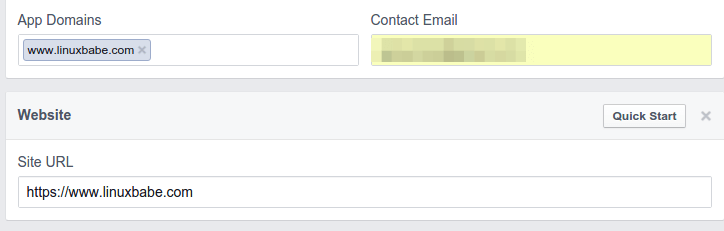
Click on Save changes.
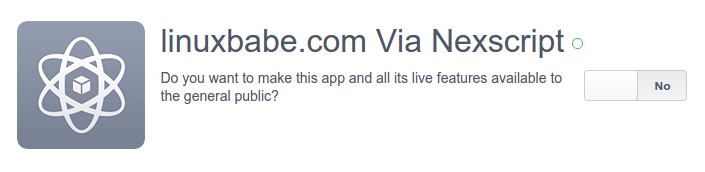
The last thing is click on Status & Review tab on the left. Then we need to change the No button to Yes so this App will be available to the general public.
2 Connect SNAP to Facebook using the Facebook App
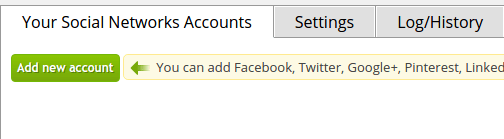
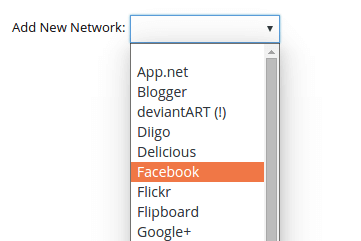
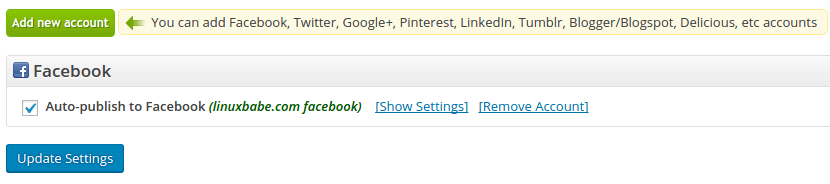
Log into your WordPress dashboard. Go to settings > Social Networks AutoPoster. Click the green add new account button. Select Facebook from the list.
In the Account Nickname field you can enter something like linuxbabe.com facebook. Enter your Facebook URL. In this case I entered my Facebook page URL. Then copy the App ID and App Secret from your Facebook App and paste them in the respective field.
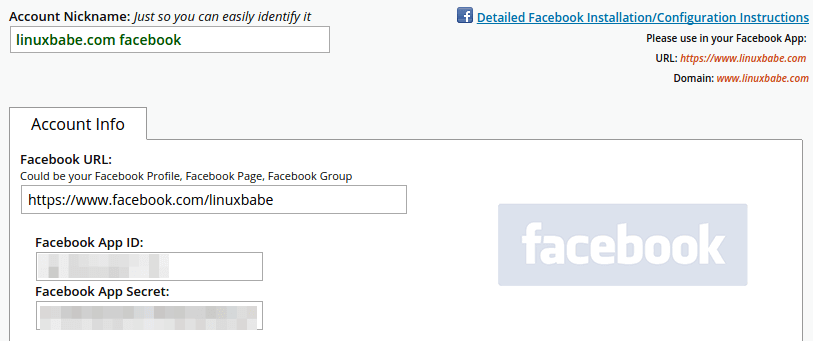
Now there’re a lot of options in text format and post type. Don’t worry about these right now, you can always change them later on. Just click update settings.
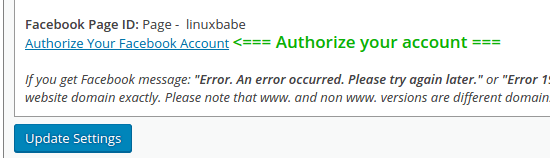
Now you will see a warning saying Unfinished setup. So click on Show Settings.

At the bottom you will see authorize your account. Click on Authorize Your Facebook Account.
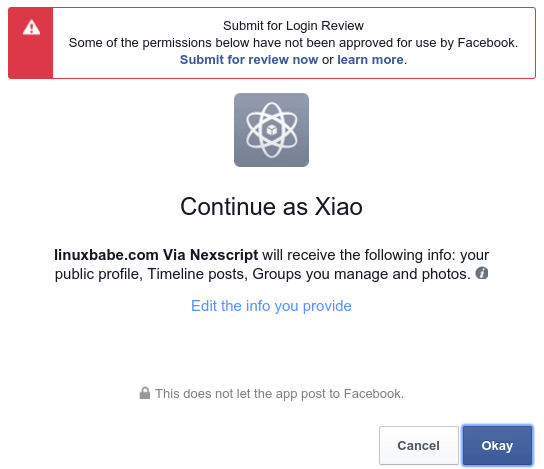
You will be taken to facebook website. Ignore the red alert and click Okay.
Next choose who to share with. In this case I will select Public and click Okay.
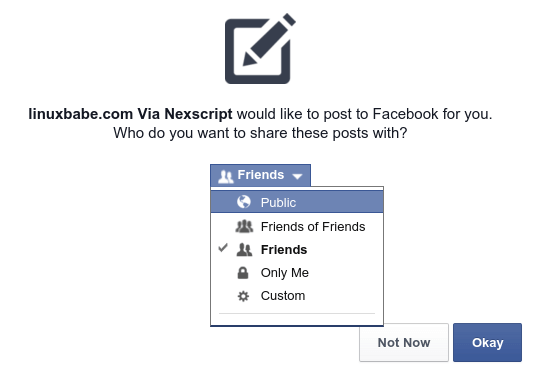
Now it ask permission to manage your facebook page. Click Okay and you will be taken back to your WordPress site.
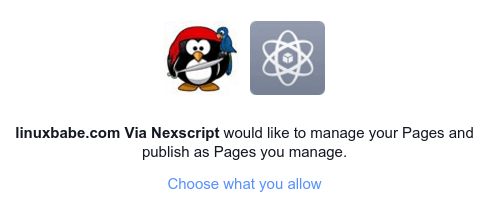
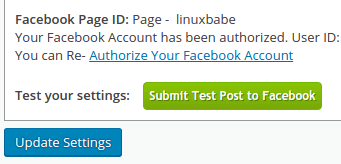
You should see the following. It means you have successfully made the connection between SNAP and your facebook account.
3 Test the Connection
In the above screenshot you can see a Show Settings link. Click that link. Then at the bottom, click the green Sumbit Test Post to Facebook button. It will send a test post to your Facebook page.
You can now check your facebook page to see if it’s working correctly. If you see the test post then you are done and you can delete the test post from your Facebook page.
How to Setup Social Networks Auto-Poster and Facebook Connection
Friday, January 1, 2016
How to Add Facebook Like Button to WordPress Site
In this tutorial I will show you how to add a Facebook like button to WordPress Site. Instead of installing a plugin, we will do it manually. When people visit your site and click the Facebook like button then in their Facebook news feed, there will be a post says they like your site or page with a link pointing to your site and maybe a featured image. So all their friends can see the your website. This really helps your website to get free and viral traffic.
Add Facebook Like Button to Your WordPress Site
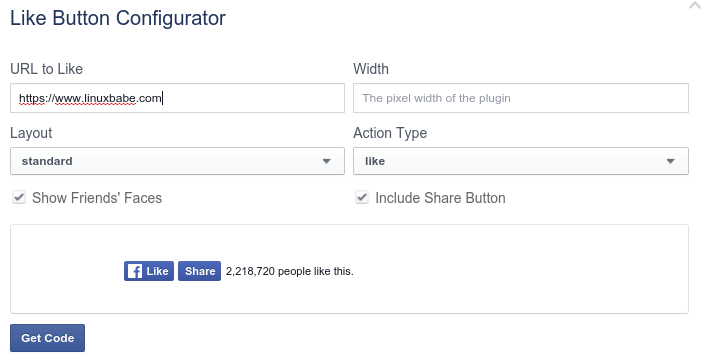
The first thing you have to do is go to the Facebook developer’s page where you can find the like button code. You do not need a Facebook developer account to do this. Click the like button tab on the left then scroll down to the Like Button Configurator section. Put your URL in the URL to Like field. The default width is good enough. And hit the Get Code button. Notice that be default it include a share button as well.
You will see two piece of code. The first is mainly a JavaScript code. The second is HTML5 code.
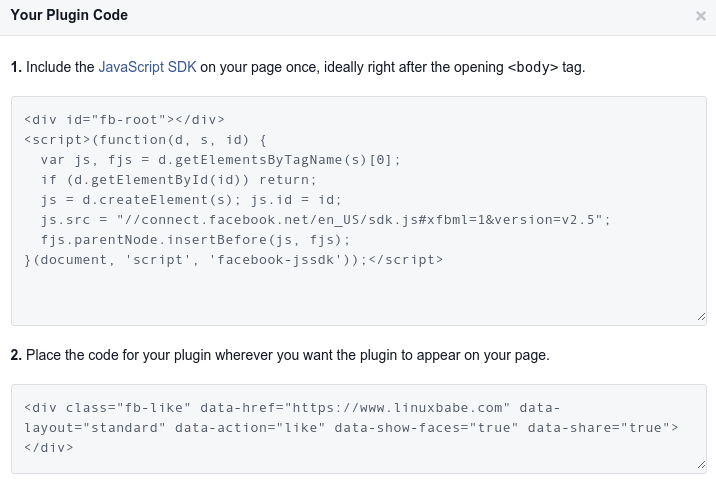
What you need to do is copy the first piece of code. Then open the footer.php file under your WordPress theme folder and paste the code right above the </body> HTML tag like below.
<div id="fb-root"></div>
<script>(function(d, s, id)
 var js, fjs = d.getElementsByTagName(s)[0];
 if (d.getElementById(id)) return;
 js = d.createElement(s); js.id = id;
 js.src = "//connect.facebook.net/en_US/sdk.js#xfbml=1&version=v2.5";
 fjs.parentNode.insertBefore(js, fjs);
(document, 'script', 'facebook-jssdk'));</script>
</body>
</html>
Save and close the file.
After that copy the second piece of code. If you want the like button to appear in a sidebar widget then go to Appearance > Widget. And drag a text widget to the sidebar, paste the second piece of code to the content area of the text widget then save it. Now you can a Facebook like button will appear in the right sidebar of your website.

If you want the like button to appear in every single post of your website, then open up the content-single.php file under your WordPress theme folder. And past the second piece of code to where you like it to appear.
 <header class="entry-header clearfix">
 <h1 class="entry-title"><?php the_title(); ?></h1>
 <?php the_tags('<div class="entry-tags clearfix"><span>' . __('TOPICS:', 'mh-newsdesk-lite') . '</span>','','</div>'); ?>
 </header>
 <div class="fb-like" data-href="https://www.linuxbabe.com" data-layout="standard" data-action="like" data-show-faces="true" data-share="true"></div>
 <?php mh_newsdesk_lite_featured_image(); ?>
 <?php mh_newsdesk_lite_post_meta(); ?>
 <div class="entry-content clearfix">
 <?php the_content(); ?>
 </div>
I pasted it right above the featured image so the Facebook like button will appear above the featured image of every post of my website.
How to Add Facebook Like Button to WordPress Site
14 Tips for Getting Adsense Approval in 2016
Tips for Getting Adsense Approval
Many webmasters have a hard time getting Adsense Approval. If you are rejected by Adsense, don’t lose hope. Here are 8 tips I listed for getting Adsense Approval.
1. Good Web Design
The first thing we have to take care of is good looking web design. It’s really important. Don’t install too many not-so-important widgets that does not add value to your visitors on your site because that make your site looks cluttered. If you have money you can buy premium WordPress theme which most of the time looks really professional. It’s a good idea to install a responsive theme or template on your website and make sure your site looks good on all platforms, desktop, tablet or smartphone.
2. Quality Original Content
Second, write quality content and have at least 20 posts on your site. You should write original content. Don’t copy content from other websites. If you insert image into your post, you can find roalty free images on the web. But don’t copy images from Google images search because that means you are copying images from other websites or blogs. A good site for roalty free image is pixabay. I search pictures on pixabay for most of my featured images of post. Many many images on pixabay are public domain which can be used for commercial purpose and requires no attribution.
Your site shouldn’t contain adult content or include sexual terms in the URL as it violates Adsense policy. Also make sure your pages don’t have links to other websites that violate copyright or contain adult content.
If your website is community driven and most content is user-generated, you are allowed to monitize your website with Adsense. But you need to monitor what your users are posting on your site. You should prohibite your users from pubishing copyright violating content or adult content.
3. Domain Specific Email Address
Third, if you have your domain specific email address, use this email address instead of Gmail to apply for adsense.
4. No Other Ads
Don’t put other ads on your site before approval. And don’t put up a page or button that says please donate. You are going to make money from Adsense, right? So don’t make a donate button on your website.
5. Don’t Worry About Domain Age
Although Google requires webmasters in some country to have owned their domain for at least 6 months, but it’s not executed by Google very strictly. The most important thing is to let your website look as professional as possible.
6. Up and Running
Make sure your website is up and running during the review process. If Google speacialist can’t find your website, they will reject your application. A while ago I was applying Adsense for one of my site. And for some administrative reason I had to stopped my web server and people could’t visit my site. This was detected by Google. About 2 minutes After I stopped my web server, Google sent an email to me saying I was rejected and I had to reapply. So make sure your website is always running during review process!
7. Domain Whois Info
Make sure your domain whois information such as email adress, physical address, telephone number etc. are the same with the information you provide when applying Adsense. if you use Linux, you can easily find your whois info by typing whois yourdomain.com in terminal. There are three IDs: Registry Registrant ID, Registry Admin ID and Registry Tech ID. The information in these three IDs should be the same with your Adsense contact information.
I once found all my whois info is completely different from my adsense contact information because I moved to anther city and changed my phone number and I forgot to update my domain name info. Once you update your domain name info, you will see your changes immediately when you check your whois info. And also don’t forget to verify your new email address when your update your email info.
8. Important Pages
Be sure to create the following pages before applying adsense.
- Privacy Policy
- Terms of Service or Terms & Conditions
- Disclaimer
- About Us
- Contact Us
In About Us and Contact Us page, write your name, email address, phone number and physical address. You can also insert a picture of you if possible.
9. Improve Site Speed
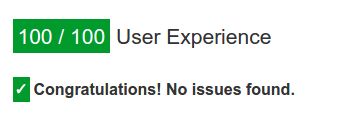
A fast website gives Google specialist a very good first impression as it represent your professionality. A fast website will also likely to attract more visitors and thereby increase the chance of clicking adsense ads by visitors. Head over to Google PageSpeed Insights to see your website problem. You can find what is slowing down your website. Also you can see your website’s user experience score. Make sure you get 100 score on user experience. Maybe your site has viewport problem or tap targets too small problem.
10. Install a SSL Certificate on Your Site
A SSL certificate identifies who own this website. It shows you are really seriously about your site and it also provides a secure enviroment for visitors. If you use VPS or dedicated server then you can easily obtain a free SSL certificate from Let’s Encrypt.
11. Blank Pages or Broken Links
It’s important to have content on every page and every category on your site. If your page or category does not have content yet, remove it or add content before applying. Make sure your site does not have broken links or 404 pages. You can install a plugin called broken link checker to see if your WordPress site has broken links. This helps improve user experience. After I installed it I found my site has 22 broken links!
12. Keep Your Website Updated Daily
During the review process, you should at least write two articles per day. Your artilces should be more than 1000 words.
13. Be Patient
You may be rejected several times by Google. Please be patitent. If you are rejected and resubmit your application immediately, you would almost certainly be rejected again! Becuase Google would think you are a spammer. So wait a week and improve your site and then resubmit your application. Although Google will not provide the specific reason, you should read the reason why you are rejected carefully. Maybe this time Google will give three reasons. You improved your site and next time Google might give you two reasons.
14. Adsense Help Center
Google has a page for Adsense helps and it’s continually being updated. So I recommend you to check it once in a while.
Please apply these 14 tips as strictly as possible. Don’t ever think you can trick Google. Google is smarter than you think. I was rejected three times and the fourth time I got approved. I hope you all will get approved. Once you’ve been approved for AdSense, you can place the code from your account on any site that complies with Adsense program policies. There’s no need for you to submit a new application for your new site. And also don’t forget to read the adsense policy beginner’s guide.
14 Tips for Getting Adsense Approval in 2016
Boost Site Speed by Compiling Nginx with Ngx_pagespeed On Ubuntu
In this tutorial, I’m going to show you how to compile Nginx mainline branch, version 1.9.9 at the time of this writting, with ngx_pagespeed module on Ubuntu 14.04 trusty. As of version 1.9.5, Nginx supports http2. So in order to enable http2 for Nginx, you have to install a version that is greater than 1.9.5.
1. Backup Your Nginx Configuration Files
Before we start, it is very important to backup your main nginx config file /etc/nginx/nignx.conf and server block files /etc/nginx/sites-available/*.conf or /etc/nginx/conf.d/*.conf.
If you have installed the nginx package before, remove it first.
sudo apt-get remove nginx nginx-common nginx-full nginx-core
2. Add Nginx official repository
First install PGP key from Nginx team.
wget http://nginx.org/keys/nginx_signing.key
sudo apt-key add nginx_signing.key
Edit /etc/apt/sources.list file.
sudo vi /etc/apt/sources.list
Add the following two lines at the end of the file.
deb http://nginx.org/packages/mainline/ubuntu/ trusty nginx
deb-src http://nginx.org/packages/mainline/ubuntu/ trusty nginx
Save and close the file. Then update local package index.
sudo apt-get update
3. Download Nginx Source Package
Make a directory in your home folder to store Nginx source package, then cd to the new directory:
mkdir ~/nginx && cd ~/nginx
Download Nginx source package with the below comand
sudo apt-get source nginx
Output
Reading package lists... Done
Building dependency tree
Reading state information... Done
Need to get 897 kB of source archives.
Get:1 http://nginx.org/packages/mainline/ubuntu/ trusty/nginx nginx 1.9.9-1~trusty (dsc) [1,415 B]
Get:2 http://nginx.org/packages/mainline/ubuntu/ trusty/nginx nginx 1.9.9-1~trusty (tar) [888 kB]
Get:3 http://nginx.org/packages/mainline/ubuntu/ trusty/nginx nginx 1.9.9-1~trusty (diff) [7,455 B]
Fetched 897 kB in 1s (459 kB/s)
dpkg-source: info: extracting nginx in nginx-1.9.9
dpkg-source: info: unpacking nginx_1.9.9.orig.tar.gz
dpkg-source: info: unpacking nginx_1.9.9-1~trusty.debian.tar.gz
Now check the contents under ~/nginx directory.
user@www:~/nginx$ ls ~/nginx/
nginx-1.9.9    nginx_1.9.9-1~trusty.debian.tar.gz    nginx_1.9.9-1~trusty.dsc    nginx_1.9.9.orig.tar.gz
4. Download ngx_pagespeed Source Package
Go to Github ngx_pagespeed download page. Download the latest beta releaseto your home directory. v1.9.32.10-beta at the time of this writting. You may need to change the version number.
cd ~
wget https://codeload.github.com/pagespeed/ngx_pagespeed/zip/v1.9.32.10-beta
unzip it:
sudo apt-get install unzip
unzip v1.9.32.10-beta
cd to the newly-created directory:
cd ngx_pagespeed-1.9.32.10-beta/Download PageSpeed Optimization Libraries (psol) and extract it.
wget https://dl.google.com/dl/page-speed/psol/1.9.32.10.tar.gz
tar xvf 1.9.32.10.tar.gz
It will create a psol directory under ngx_pagespeed-1.9.32.10-beta directory.
5. Add ngx_pagespeed Module to Nginx Compilation Rules
Edit Nginx compilation rule file.
sudo vi ~/nginx/nginx-1.9.9/debian/rulesIn this file you will see two configuration block override_dh_auto_build and configure_debug. In override_dh_auto_build, add the following line at the end.
--add-module=/home/<username>/ngx_pagespeed-1.9.32.10-beta
Please note that you need to append a backslash at the –with-ipv6 line, or –add-module will be ignored.
# some text left out.
          --with-file-aio \
         $(WITH_HTTP2) \
          --with-cc-opt="$(CFLAGS)" \
         --with-ld-opt="$(LDFLAGS)" \
         --with-ipv6 \
         --add-module=/home/<username>/ngx_pagespeed-1.9.32.10-beta
 dh_auto_build
configure_debug:
     CFLAGS="" ./configure \
          --prefix=/etc/nginx \
         --sbin-path=/usr/sbin/nginx \
         --conf-path=/etc/nginx/nginx.conf \
# some text left out.
Save and close the file.
6. Compile and Install Nginx with ngx_pagespeed
cd to the nginx source directory.
cd ~/nginx/nginx-1.9.9/Install all the dependancies that is needed to build Nginx:
sudo apt-get build-dep nginx
Use the following command to build a deb package.
sudo dpkg-buildpackage -b
Wait a few minutes. My server completed the task around two minutes. When it’s done, there will be two deb file in ~/nginx/ directory. The first is the one that we will install to Ubuntu server. The second is a debug version.
user@www: ls ~/nginx/*.deb
/home/user/nginx/nginx_1.9.9-1~trusty_amd64.deb /home/user/nginx/nginx-dbg_1.9.9-1~trusty_amd64.deb
Install the first deb package to your system.
sudo dpkg -i nginx_1.9.9-1~trusty_amd64.debAfter it’s installed, check the config arguments of Nginx
sudo nginx -V
If you see the following line at the end then ngx_pagespeed module is successfully added to Nginx.
--add-module=/home/<username>/ngx_pagespeed-1.9.32.10-beta
7. Enable ngx_pagespeed Module
pagespeed is installed along with Nginx, but it’s disabled by default. Before enable it, I recommend you to test your website speed at pingdom.com or webpagetest.org. After it’s enabled, do a test again so as to compare the two results.
Create a folder for pagespeed caches and change its ownership to Nginx user.
sudo mkdir -p /var/ngx_pagespeed_cache

sudo chown -R nginx:nginx /var/ngx_pagespeed_cache
Now open Nginx main config file /etc/nginx/nginx.conf
sudo vi /etc/nginx/nginx.conf
Add the following two lines in http block
pagespeed on;
pagespeed FileCachePath /var/ngx_pagespeed_cache;
Save and close the file. Then edit your server block file.
sudo vi /etc/nginx/conf.d/yourdomain.com.confAdd the following lines to the server block.
location ~ "\.pagespeed\.([a-z]\.)?[a-z]2\.[^.]10\.[^.]+" add_header "" "";
location ~ "^/ngx_pagespeed_static/"
location ~ "^/ngx_pagespeed_beacon"
Save and close the file. Reload Nginx configuration.
sudo service nginx reload
8. Check if ngx_pagespeed is Working
Go to your website. Refresh a few times then check your page source. Hit Ctrl+F key and search pagespeed. You will see that many of your website resource has been processed by pagespeed. Some css files and javascript files are combined into one file. If you use Google Chrome browser, you will see that the picture of your website is in webp file format. webp can greatly reduce image file size.
You can also find ngx_pagespeed is working by comparing your website speed test.
Also on you server you can issue the following command:
curl -I -p http://localhost| grep X-Page-Speed
You will see X-Page-Speed and it’s version number.
X-Page-Speed: 1.9.32.10-7423
9. Hold Nginx from Being Upgraded
If a newer version of Nginx is available in the repository, the apt-get upgrade command will upgrade Nginx by default and you ngx_pagespeed module will be gone. So we need to prevent Nginx from being upgraded. This can be achieved by the following command:
sudo apt-mark hold nginx
To show what packages are hold:
apt-mark showhold
If you prefer aptitude:
sudo aptitude hold nginx
Hope this article will be helpful to you.
Boost Site Speed by Compiling Nginx with Ngx_pagespeed On Ubuntu
Subscribe to:
Posts (Atom)